Page speed is an important search engine ranking factor and it plays a huge role in user experience. Consumers have high expectations and low patience when it comes to loading time. You’ve worked hard to create a beautiful webpage and earn clicks from interested searchers; wouldn’t it be a shame if you lost them within a few seconds of arriving?
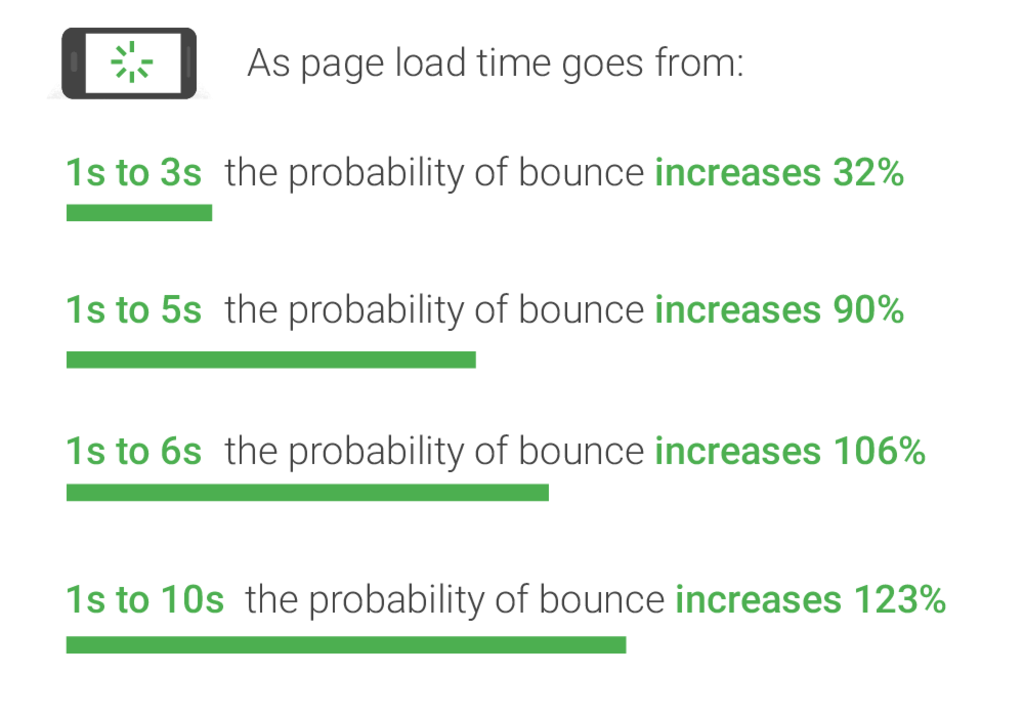
A study conducted by Akamai, which analyzed data from over 10 billion user visits on top online retail websites, found that a two-second delay in load time increases bounce rates by 103%.
Around 47% of consumers expect a webpage to load in 2 seconds or less. If you aren’t meeting this standard, you are losing a significant portion of your hard-earned traffic before they even get the chance to look around.
There are a number of factors that can contribute to slow page load and some of them are complex issues that you would need a professional developer to solve. However, lack of image optimization typically plays a big role in slowing down the average website and it’s a relatively easy fix.
If you’re looking for a quick way to speed up your website, use our tips below to learn how to create optimized images for the web.
Is my website fast enough?
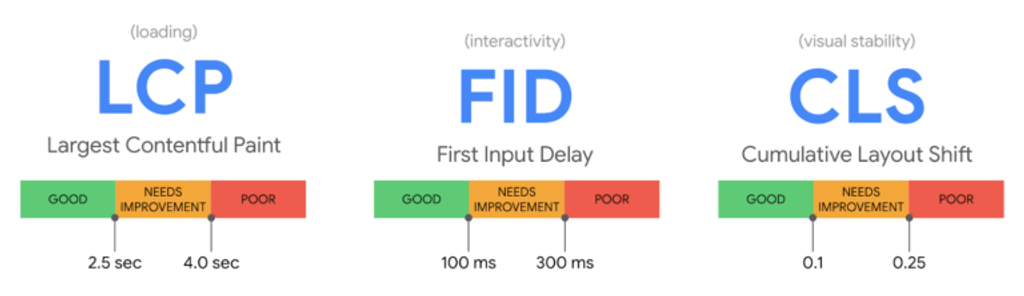
You can use Google’s Pagespeed Insights (PSI) tool to assess the speed of your webpages. When it analyzes your website, PSI runs Lighthouse to collect lab data on your site and also collects real-world field data. The 3 Core Web Vitals are important metrics that PSI uses to measure page load. Here’s Google’s explanation of the Core Web Vitals:
Largest Contentful Paint (LCP): measures loading performance. To provide a good user experience, LCP should occur within 2.5 seconds of when the page first starts loading.
First Input Delay (FID): measures interactivity. To provide a good user experience, pages should have an FID of less than 100 milliseconds.
Cumulative Layout Shift (CLS): measures visual stability. To provide good user experience, pages should maintain a CLS of less than 0.1.
Images and load speed
HTTP Archive reports that on average, images account for 21% of page weight, with the only heavier item being video content. Most beginner developers and website owners don’t know how to optimize large images for web use, and this results in web pages that are far heavier (and slower) than they need to be.
You should make it a goal to reduce the total page size to 1-2 MB or less. Image optimization is all about trying to reduce your larger file sizes as much as possible without ruining image quality. By implementing the right best practices, it is possible to reduce image file sizes by 80% without any visible loss in image quality.
When optimizing images for better performance, you should find a good balance of these three factors:
- Image Size/Dimensions
- Image Compression
- Image File Format
How to resize and compress your large image files
When you import a photo from your phone or a digital camera, it will usually have very large height and width dimensions. This is great for printing high-quality photos or viewing them on a desktop computer, but it is not good for website use. You will most likely have to resize and compress them to reduce the file size of your images.
Make sure your images are sized to the exact sizes required for your website’s layout.
For example, if you took a 3000x3000px image and used it in a 300x300px space without actually resizing it, you are adding 10x more weight to your page than necessary. Resizing an image using HTML attributes or CSS doesn’t reduce the file size.
If you adjust images to the right size before uploading them to your site, the web browser will not have to shrink them and your website will load faster.
Your options to resize images are:
- Do it manually using your computer’s image editor, such as Adobe Photoshop or GIMP
- Do it manually using a free web application such as PicResize
- Install an image optimization plugin for WordPress, such as Optimole, Imagify, or EWWW Image Optimizer
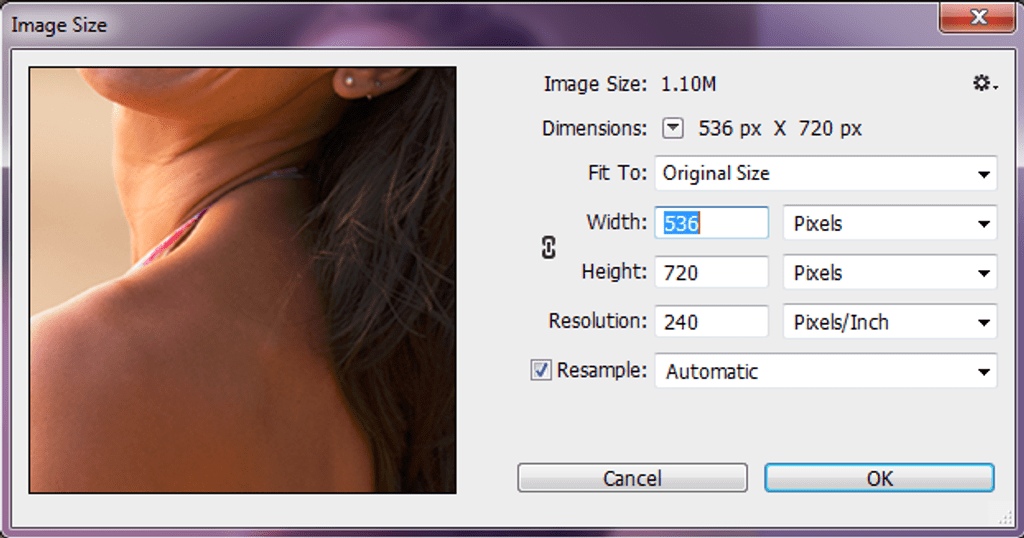
Image compression is a process that doesn’t change the dimensions or resolution of an image but stores it in a more efficient format. Most image editing software has built-in compression features. For example, on Photoshop you can select File > Save for Web and Devices. You can also compress images using a free web application, such as TinyPNG or TinyJPG.
When you use lossy compression, you lose some of the image data. That means you lose some of the original image quality, though it isn’t always noticeable. JPEG is a lossy image format. When you use lossless compression, you reduce the file size without losing any quality. However, you can’t reduce the file size as much as you can with a lossy compression format. GIFs and PNGs are lossless image formats.
Choose the right file formats
There are different formats for image files, and using the wrong file format can add significant weight to an image. It can also impact the image quality. JPG files (or JPEG files) are smaller than other formats such as PNG and GIF.
- If you are saving a photograph, JPG/JPEG format is always the best option
- If you are saving a logo or graphic artwork image, PNG will most likely be the best file type
- GIF format should only be used for animated images
Article by John Kennedy
Born and currently based in Lowell, Massachusetts, John is an impassioned copywriter and Olly Olly’s fearless Content Manager.
Like what you read? Send John a message here.